Tuesday 7 February 2017

Wonderful Waitangi Weekend - part 2

After the heat of Sunday, it was definitely time to get making my cordial! The recipe I used belongs to my ex-manager's mother. He would make up bottles of it and bring it to share with us at the office on hot days. I tweaked the recipe though, increasing the quantity of lemon juice and decreasing the water, in a desperate attempt to use up the bottles of lemon juice I collected a few weeks back. Even by doubling the recipe I still used up only one 1 litre bottle of juice. I ended up having to make the mixture in two saucepans – time to get a bigger saucepan – as even my biggest saucepan wasn't big enough!

And I seriously underestimated how many bottles I would need! Still, it was an easy recipe to follow and came out fabulously for a first batch. Next time I'll use a stock pot and order bigger bottles for bottling.

While I was boiling the water and sugar mixture I gently heated the lemon juice in a separate saucepan. My rationale was that because the syrup is not heated much after the juice is added, preheating the juice would essentially pasteurise it. I sterilised my bottles in a water bath in the oven at just over 100℃.


Lemon Cordial


  • 500ml lemon juice and zest
  • 1 kg sugar
  • 1.5 litres of water
  • 2 tbsp citric acid
  • 1 tbsp tartaric acid

Boil the water, then add the sugar, bring back to just boiling. Add juice, stir well, and take off the heat.

Add the acid, stirring with a wooden spoon until dissolved.
You can strain it or leave the zest in.

When serving dilute around 30ml of cordial syrup to 170ml, according to taste. Use soda water for a sparkling lemonade.

* * * 

My second project of the day was to bottle my lemon vinegar, which had been steeping for the last few weeks.

I emptied all the jars and strained out the lemon pieces leaving behind only the liquid. I also added some apple cider vinegar to the mixture to boost the 'vinegarness' of it. Then I bottled it. Ready to use in salads or worst case: eco-friendly cleaner :-).

Wonderful Waitangi Weekend - part 1

I had a wonderful Waitangi Weekend.

I started with my usual run to the farmers' market on Saturday to get my weekly provisions and then spent the rest of the day in my studio working on preparing stock for my new die business, Dieorama. Trixie kept me company and had particularly extreme case of the bouncies, dashing back and forth and binkying.

On Sunday, it was time to sort out the things I had drying in my hot water cupboard.

Dried lemon zest
The lemon zest dried perfectly, having turned a lovely golden brown and still smelled gorgeously lemony. I put the dried rind in a plastic jar with a small desiccant packet to keep it dry, for later use.

My lavender too, turned out beautifully and still retained its amazing fragrance. I cut the stems shorter so that I could get them into a large ziploc bag. I'll the pieces I cut off as lavender-scented toothpicks/mini skewers. Again I added a desiccant to the bag. Storing them like this means I can either use the flower stalks whole or use just the flowers that collect at the bottom of the bag.

I also packed up more dried rose petals that I am collecting from the two profusely-flowering yellow rose bushes by my front door. Not sure what I'll do with them, but it seemed sad to let them go to waste.

With all the latest dried items packed away, I set about making some bath bombs and experimented with a lemon lavender fragrance combination. I used lemon and lavender essential oils along with about 2 tbsps each of my dried lavender flowers and lemon zest. For molds, I used an ice tray and plastic ice sphere molds I found at Kmart some time ago – useless for making ice as they're not watertight and the water just runs straight out along the seam as soon as you fill them, but not too bad as molds for bath bombs.
Lemon and lavender bath bombs
By the time I was done, I was sweltering. Summer, it seemed, had arrived at last. I regretted that I still hadn't made any lemon cordial as a lemonade would've been perfect as I headed outside for an afternoon break on my lounger in the shade of the walnut tree as the heat of the day started to cool. A perfect way to finish off before heading back inside for a relaxing bath fragranced with my new delicious bath bombs followed by some favourite Saturday TV and dinner.


Wednesday 25 January 2017

Garden update - January 2017

I can't have a garden without roses and herbs. They're the first things I planted in my previous garden and now in my new home in Featherston, history repeats itself. At least this time I had the perfect spots already prepared. Like in Tawa, I chose to plant my roses along the front of the house and there were two large rose bushes already. The other existing plants were overgrown and straggly and needed to come out anyway, so it was the perfect spot.

I have to admit that I didn't do the hard work myself. I'm not as able-bodied as I was in my twenties and ripping up brush and digging holes is really hard on my joints, so I got a professional in to do the hard part for me. What she achieved in three hours would have taken me days otherwise. I got the roses online (you can get just about anything online these days) from South Pacific Roses. They arrived in excellent condition and I doing really well. I ordered the most fragrant ones I could find in each of the standard rose colours. I can't wait for the flowers to open! Keep up to date with my Facebook page, you'll be sure to see pictures of the roses there.
The new rose garden
Wednesday morning was gorgeously mild and still, and quite conveniently the herbs I ordered from Awapuni Nurseries (I love shopping online!) had just arrived that I decided to postpone my office work and instead get stuck into planting my herb garden.

I had already cleared out some of the weeds a few days earlier, so it didn't take me long to dig out the rest of the weeds and prepare the bed.
The prepared bed
Meanwhile Trixie worked on quality control making sure all the newly-arrived herb plants were up to scratch by tasting them!

I like buying plants from Awapuni as they come bare-rooted wrapped up in newspaper. Not only does this help cut down on plastic container wastage (they reuse them by sending you the plants only), it makes planting a breeze as you don't have to spend time and effort getting the plants out of punnets. And you often find one or two extras thrown in for good measure ;-) In next to no time, the bed was all planted up and ready for a good soak with the hose. The heat of the day had arrived and I was happy to now go back to doing office work. Aaah, the joys of working from home!!

All planted up


Sunday 22 January 2017

When life gives you lemons - part 3

I took a break from lemon operations on Friday and caught up with some emails and other admin. In the evening though I tried out a lemon chicken recipe that I found on Pinterest for dinner. It was certainly fun to make, and smelled heavenly as I grilled the lemons in the skillet. As for eating though, I was a little less enthused. I guess I'm not really a savoury lemon person – too sour for my taste. But, it was a nice change from my usual dinners all the same.

A picker getting stuck in
Saturday brought with it sunny weather and I had two people come over to pick lemons and so I made my first small change from my lemon harvest – $3 a bag. At last the mass of lemons is starting to reduce, though the tree is still pretty full, sigh. I can't even give them away! It seems everyone has a lemon surplus around here.

Once my lemon pickers had been, my first project of the day was to make lemon vinegar. I had quite a lot of fruit from Wednesday's batch had tears in the skin where they had detached from tree and needed to be used fast. So after I washed them, I chopped them into chunks and packed them into glass jars which I then filled with white vinegar. I'll leave them like that for two weeks or so to allow the vinegar to infuse with the lemon. After that I'll strain the mixture, removing the fruit, pips etc and bottle the liquid. It ought to be good in salads and if it flops it can be used as a eco-friendly cleaner, lol.
Lemon vinegar in the making

I spent the rest of the day washing, juicing and zesting the rest of Wednesday's lemons. I ended up with a large tub of zest and another 1.5 litres of juice, which I put in the freezer. Sadly I ended up having to throw out a lot of them as they had already gone off, so that's the end of the harvesting. I'm just not using them fast enough, so it's better if they just stay on the tree until I need them.

On Sunday, I moved on to flavouring salt. I used the zest I collected on Saturday. Be warned, if you are going to do this, use an old blitzing machine that you don't mind damaging. The combination of the abrasiveness of the salt and the acidity of the lemon will eat away at the plastic jug and dull blades. I used 500g coarse sea salt with 4 heaped tablespoons of lemon zest. Blitz until all the zest is reduced and evenly mixed with the salt. Then transfer to a paper lined pan and dry in an oven at 105℃ for around an hour to remove all moisture. Bottle once cool.
Making lemon salt
I also made a second batch with the addition of fresh rosemary. This time I used 500g coarse sea salt, 2 heaped tablespoons of lemon zest and 2 heaped tablespoons of rosemary leaves. Blitz and dry as before.
The finished salts
It was a good day and to reward my hard work I whipped up a batch of scones which I flavoured with – you guessed it – lemon zest! Topped with my strawberry jam, they were absolutely scrummy!


Thursday 19 January 2017

When life gives you lemons - part 2

Zesting
After Caroline left, I still had a large number of picked lemons remaining that needed to be dealt with quickly. So Wednesday morning, I continued juicing them to freeze for future use. Following suggestions on the Internet, I discovered that the easiest way to remove the zest is to use a vegetable peeler. You can then cut the pieces of skin into strips with a sharp knife or mezzaluna.

I am going to dry this batch of zest to use in bath salts, so I spread out the zest in a large glass pan and then pressed down paper towel to soak up the excess juice. After leaving the zest like this overnight, I think transferred to it to a drying frame (an old picture frame with net attached that I used for paper-making once), covered it with another layer of netting and then hung it up in my hot water cupboard.
Drying the zest
I
Haul no.2 and still heaps to go!
finally came to the end of the lemons, having put over a litre and a bit of the juice in the freezer, when a friend popped round to help me harvest some more. Just in time too. Soon after we got them rinsed off and moved onto the deck, the weather packed in, bringing with it rain and wind. And so, I finished the day with another huge haul to deal with. Back to square one, sigh!

Thursday morning, the worst of the storm had passed and we were treated to another spectacular rainbow. The dawning of another day of the age of lemons.

A lemon dawn
I started by baking a lemon syrup loaf from a recipe off the Chelsea sugar site. For the syrup I used 1/3 cup of juice to 1/3 cup of sugar to make it extra syrupy. 
Lesson learned:
Line the tin with paper as once the syrup has soaked in, the loaf is impossible to get out!
It might also have helped to let the loaf cool down properly, but I was impatient and hungry to get a taste of my baking and in my haste to get the luscious loaf out of the pan it split, leaving the bottom in the pan which I had to scrape out. Sigh! Of well, it certainly tasted good and as I had baked it for myself, it didn't matter. 

I continued juicing lemons, but I must admit, I was starting to get a bit jaded of the process. I tried a shortcut of blitzing the whole zested/skinned lemons, plus a small amount of skin in my blender and then sieving the pulp. I figured that since many recipes call for zest and juice, why not simply chuck in the whole fruit. Besides, store-bought orange juice is made the same way, the entire fruit – skin and all – is squeezed, which is why it's so sour and bitter even though the fruit is so sweet. 

It worked well and produced that same sour tang to the juice that you get in squeezed orange juice. I think it will work well for my lemon cordial where one wants a tangy sharpness to the drink, but not for my lemon jelly where sweetness is the aim.

Juicing for cordial
Trixie: Operations supervisor, office paper shredder and nap specialist
Another two milk bottles full of juice later, and still a huge number of lemons to go, I packed it in for the day. Like my blender, I work best in short bursts! Time to follow Trixie's example and have a nap.


Wednesday 18 January 2017

When life gives you lemons - part 1

My new country life in Featherston gave me more than my fair share of lemons! More lemons than I can cope with.

The lemon tree - misleading from the outside, but look under the branches and it's lemons from heaven
I made a valiant attempt to harvest them on Monday, but after tripping up over my own feet and grazing my knee pretty badly on the concrete path, I gave up for the day. Instead I washed the lemons I had already picked, which turned out to be a pretty reasonable haul – around 15kg worth, though it didn't make a dent to the crop still left on the tree.
Picked lemons and after washing
Lady Lemon
On Tuesday, my friend Caroline, aka Lady Lemon came up from Wellington for the day. After meeting her at the train station, stopping for morning tea at a local cafe and going on a walking tour of town we spent the rest of the day cooking up lemony goodness in my kitchen.

Caroline baked us a yummy lemon coconut cake and I set up about juicing as many lemons as I could to use later. Caroline was very envious of my tree and left for the train with a backpack full of lemons and lemon juice to use in her curd making.

Lemon and coconut cake


  • 250g melted butter
  • 1/2 cup white sugar
  • 1/2 cup brown sugar
  • 3 eggs
  • 2 cups self-raising flour
  • 1 cup desiccated coconut
  • 1 lemon zest and juice (2 if using Meyer lemons)
  • 1 cup milk
  • 3 tsp vanilla essence


Preheat oven to 180°C. Grease and line cake or slice tin.

Place butter and sugars into large bowl and beat until light and fluffy.

Add the eggs one at a time and mix well. Gradually add the flour, coconut, milk, vanilla and lemon juice and zest and mix well until well combined.

Pour mixture into baking tin and bake for around 30 minutes until golden and a skewer comes out clean.  Allow to cool in tin before turning out.

Serve as is with cream or ice with a cream cheese icing or simple glace icing using lemon juice.
Lemon Coconut Cake


Monday 16 January 2017

Lavender loveliness


It's something I wanted to do when I was in Wellington, but never got around to it. It was such a long way to go, but since I moved to Featherston that all changed. Now picking lavender in Carterton at Lavender Abbey is just around the corner.

A good friend of mine came up for the weekend and together we headed out on Sunday morning. Despite some rain and strong wind during the night, the weather settled and we were treated to good picking weather, though there was still a fine drizzle – it helped keep the heat of the day down.

Lavender Abbey is set in beautiful surrounds with grassy paddocks and sheep on all sides. The field itself wasn't quite as big as we imagined, but then each compact lavender bush produces a fair crop. The secret is to prune the bush back at the end of the season to encourage increased flower growth and long flower stems in the next season.
Lavender Abbey, Carterton, New Zealand
L. x 'Grosso'
Lavender Abbey grows the variety, Lavandula x intermedia 'Grosso', which has long stems and is strongly perfumed. Compared to the common garden varieties L. angustifolia and L. dentata, which tend to smell simply 'herby', the fragrance of L. x 'Grosso' is sweet and truly a perfume.

The field was buzzing – quite literally. There must have been thousands of bees buzzing about the bushes and we picked the lavender rather gingerly and made sure that when we left we checked our bunches for any stowaways before getting in the car.

There is certainly money to be made in growing lavender. We paid $5 a bunch and I came back with a double bunch for $10. So at a rough approximate, if one counts only the flowers, you could be looking at a going rate of around $100/kg?! And with lavender and vintage goods making a come back, I think it might be a good time to start planting lavender. I'm certainly going to get my own Grosso plants so that I can harvest my own flowers for free.

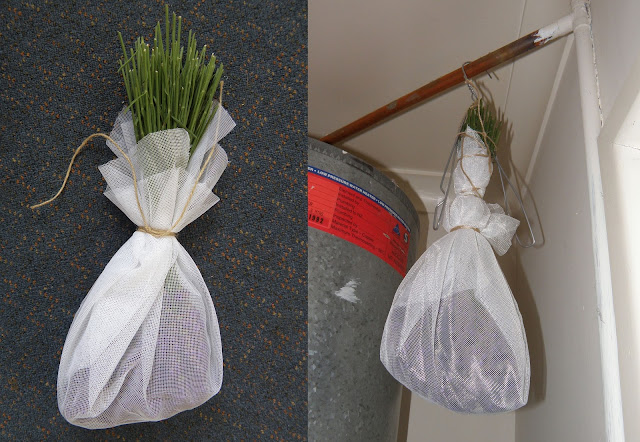
As I want to use the flowers in bath salts and other products, I prepared the flowers for drying when I got home. This is easily done, you don't need any fancy equipment, just some netting and a warm dry area like a conservatory or a hot water cupboard. Wrap the flowers in a square of netting and tie to the bunch. This is to catch any flowers that fall off and to protect the flowers from bugs and dust. Then hang the bunch in your dry area for several weeks until the flowers are dry. I tied my bunch to an old coathanger to make it easier to hang it in my hot water cupboard.
Drying the flowers